
")
How to buffer a pH Electrode
 After many years in any industry, it is very easy to assume that everyone else has been around for a similar time and is as experienced as we are. But even if you don’t have the experience we have, we use our knowledge base to impart the knowledge we’ve obtained over the years to inform you. In this article we will explain to you why buffering a pH electrode is very important.
What is Buffering?
Buffering is calibrating the meter and electrode against a known pH standard. All pH electrodes and many other electrochemical sensors need to be regularly calibrated to ensure they provide accurate measurements of the solutions under test. The accuracy of any pH system depends upon taking care of your pH electrode system. Don’t just fit it and forget it! It’s not like a temperature sensor. pH electrodes need to be kept clean, calibrated regularly and against buffers. pH Buffers are pH solutions of precise pH values, which are stable over varying temperature ranges.
Myths about buffering?
There is a myth that all you need to do is take a sample measurement with a portable pH meter or pH paper and adjust the controller or transmitter to read that pH value. This is like setting a stopped clock to the present time, it’s only correct at that point in time. The same goes for your pH electrode.
How do you know it will respond to a change in the pH of the solution?
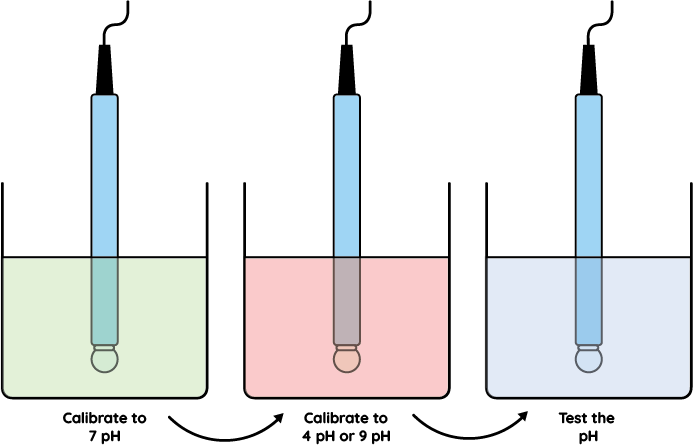
You need to know the point where the electrode produces 0 millivolts. The electrode produces 0 millivolts at 7 pH. However, electrochemical sensors can vary slightly with manufacture and changes occurring over the life of the electrode. Depending on the solution the electrode is used to measure, and the temperature and pressure the electrode is subjected to, the millivolts produced at 7 pH can vary. We need some adjustment to compensate for this varying value, hence the buffer or zero adjustment on your pH instrument. For accurate pH measurement and control the calibration needs to be carried out from a minimum of two points. If you are working on acidic solutions use 7 and 4 pH buffers, if you are working on alkaline solutions use 7 and 9 or 10 pH buffers.
This adjustment is usually achieved by using the slope or span control on your pH instrument so you have made the instrument correspond to two points on the pH scale. It is good practice to check the electrode in a third buffer solution, i.e. use a 10 pH buffer if you have calibrated to 7 and 4pH and use a 4pH if you have calibrated to 7 and 10 pH. The instrument should display the value of the third buffer.
How to Buffer an Electrode?
We are assuming an on line pH control system with the electrode either immersed into an open vessel or installed in a pipeline that you are measuring. Wear the relevant safety gear for working with chemical solutions and adhere to all relevant health and safety regulations appertaining to the industry and country you are working in. Isolate any item the pH loop may be controlling such as dosing pumps or valves, any divert systems or alarms, including alarms connected to BMS systems, which may operate remote alarms off-site.
If the electrode is in a tank, ensure it is safe to remove the electrode. If the electrode is in a pipe, isolate the line and drain out any liquid before carefully removing the electrode. Examine the electrode for any damage and clean it, as per the manufacturers instructions. Ensure the glass bulb is bright and clean with no deposits or traces of fats or grease on the glass bulb. Wash the electrode with demin water and place in the 7 pH buffer solution, and adjust the instrument to read 7pH, as per the manufacturers instructions. Some instruments have auto buffer recognition to help you.
Remove the electrodeand wash off with demin water and place the electrode in the second buffer, usually either 4 or 9 (10) pH, adjust the instrument to read the second buffer as per the manufacturers instructions. Wash off the electrode with demin water and place in the third buffer as a check to see the electrode responds to both rising and falling pH values. The electrode may now be replaced back into the process, if in a pipe, check to ensure there is a leak proof seal and remember to reset any controls or alarms which where disabled.
Where the manufacturers recommendations differ from our suggestions, follow the manufacturers recommendations, as there may be variations on the procedure with different manufacturers. If you wish to carry out this work yourself we are able to supply buffer solution from stock, with values of 4, 7, 9, and 10 pH, either as ready made up liquids or as powders making up 500 millilitres of solution when dissolved in demin water. If you are not confident at carrying out the calibration yourself we offer routine servicing and calibration of pH instrumentation by our team of mobile service engineers.